Showing posts with label tutorial. Show all posts

Thursday, May 14, 2009

Cloud Age Symphony


From [3CH]: "A menacing commader dances with an assassin in a steampunk universe." Click here for the full-size image.

Details


Process


Saturday, February 14, 2009

3CH by Layers

EDIT: Okay, now it looks like several of the .gifs aren't working properly. If you're not seeing any animation for these, go ahead and follow the Picasa links and they should display correctly.

Apologies. --The Management 

Thursday, November 6, 2008

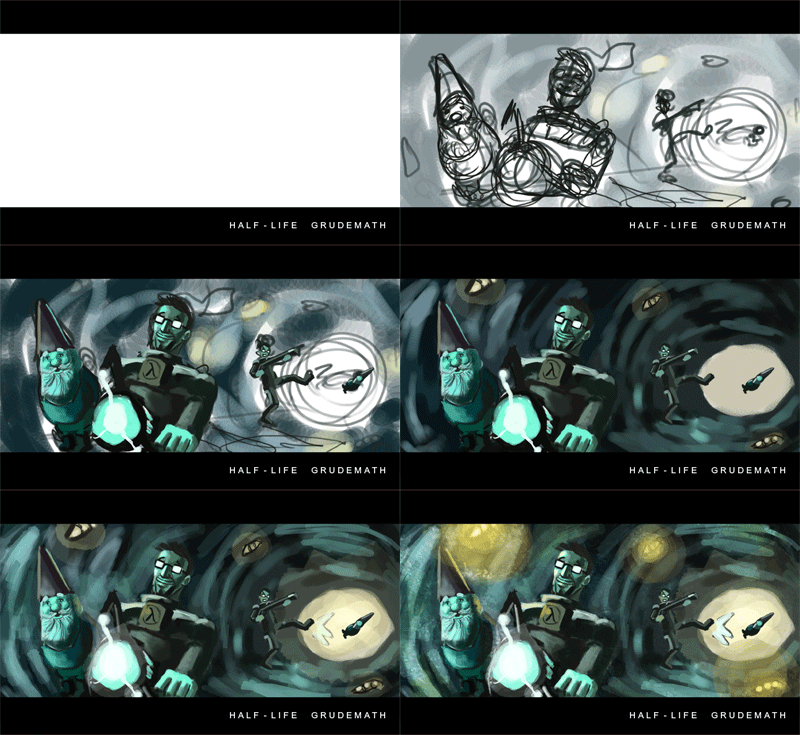
Grudemath Process

My friend Exit recently asked me how I went about making the Grudemath speedpaints. My first response -- screw up a lot, desperately try to fix things, then get tired and call it quits -- was pretty accurate but not really that helpful. After all, that's pretty much my artistic process for everything.

So, in an effort to shed a little more light on the Grudemath sketches, here are a few time-lapses of the two most recent speedpaints. Keep in mind that these are meant to be as quick as possible -- the Episode Two one, for instance, took me about 75 minutes. Moreover, both of these are heavily influenced by Ashley Wood, which contributes a little bit of comic book dynamism. Hopefully, this will be useful to somebody out there.


I was having trouble thinking of standout moments from the second half of the Episode One run. My first idea -- seen here briefly at the beginning -- was sQuiz being accidentally headshot by Alyx during the final mission. I roughed it out before deciding I didn't like it, but I was drawn to the train station as a general setpiece. So I decided to stage a straight-up action scene, and I made it a personal challenge to make it look like a frame out of a graphic novel.

As you can see, I start with a simple sketch that's extremely rough -- most of the idea is still in my head at this point. My main goal here is to establish main lines of action, dominant shapes, and a general sense of proportion. After that, I splash in a few rough colors underneath to guide the painting process. Here I took a cue from the actual art direction of Episode One, which employs a lot of warm tones.

From there, I just build up the primary figures and background elements with the hard round airbrush. After several passes of adding detail, I move on to a global layer for finishing effects and texture brushes. I also throw on a yellowish splatter texture at the very end, which is not too different from what Gabe is doing nowadays.

The concept for this sketch was easy because sQuiz told me exactly what to include. Notice that the composition conforms to the standard foreground-to-background scheme I've used for the majority of the Grudemath pics. I've found that it's usually the easiest way to add interest to some kind of interaction or comparison. (Or maybe I'm just lazy.)

Again, I start out with an extremely simple sketch. I also cheated a bit by color-picking from this screenshot, which incidentally was also a very useful reference for the gnome. From there on out, it's a pretty straightforward process of building up the figures, adding lighting effects, and laying in some texture.

Thursday, October 30, 2008

Oilbending

I've recently wrapped up work on a commissioned painting for a client in Maryland, who plans on presenting it to his wife for Christmas. You might recognize the source material; suffice to say that it was tremendously fun to work on. Perhaps more importantly, it finally got me painting again.

As with all of my projects, I started off the painting with a round of concept drawings, which were sent to the client for approval.
The initial concept sketch, drawn freehand from a reference.

Concepts for a more illustrated approach to the borders, which we ended up deciding against because it might have looked too busy. Probably a good choice, even though I thought some of these looked pretty cool.
Symbol practice, with a few locations on the side.
Major location concepts. Pretty much all of these made it into the final, albeit with abbreviated detail.

Minor locations, which ended up being so boring that I quickly ended up doodling.

Naturally, after the concept stage I dove right into the painting. Here are a few of the progress shots.


The entire map, roughed out in pencil. I used a grid to ensure as much accuracy as possible.

Base colors and shading applied to each of the landmasses.

Water and sparing detail on the Earth Kingdom landmass.


More land features, base colors around the border, and a little bit of detail work in the corner.


Near-finished border and landmasses, and a second base coat over the water.


Just thought it's cool how it catches the light in the dark.


First wave layer.

Second wave layer.


Light and dark glazes over the ocean.


The final product.